CLICK HERE FOR FREE BLOGGER TEMPLATES, LINK BUTTONS AND MORE! »
Showing posts with label dessert. Show all posts

Tuesday, August 16, 2011

Paula Deen's Cream Cheese Tarts

I am a sucker for an accent, which makes me love Paula Deen all the more.  I was watching the Rachel Ray Show the other day and she was on as a guest making these fabulous treats.  I was instantly intrigued when I heard it was only 5 ingredients for the tarts.  Then I saw her whip them up lickety split and I knew that even if I didn't make dinner that day we would have treats.  The idea isn't new or ground breaking but super delicious.  I've never dared make a cheesecake because I didn't have a spring form pan, it sounded hard, I hate making graham cracker crusts and patting them down and getting it even, etc.  This alleviated all that and I don't think I sacrificed any on the taste either.


Paula Deen's Cream Cheese Tart with Raspberries but I didn't use any raspberries
Recipe from the Paula Deen on the Rachel Ray Show

12 Vanilla Wafers
2 Eggs
1 teaspoon Pure Vanilla Extract
1 cup Granulated Sugar
2 8oz. packages Cream Cheese, softened
Topping Options: Raspberry preserves, fresh raspberries, pie filling, or whatever kind of fresh fruit you like, Cool Whip

Line a muffin tin with paper cups.  Place a vanilla wafer, flat side down, in each cup.

Beat cream cheese until fluffy.  Add sugar and vanilla mix well.  Add eggs, one at a time, beating well after each egg. 


Spoon mixture over each wafer.  I used about 2 HEAPING tablespoons per cup.


Bake at 350 (doesn't everything bake at 350?) for 20 minutes. They get real puffy like this:

As soon as you remove them from the oven the tarts will fall.  That is what you want--then they make a little bowl like shape that is perfect to hold your toppings.  Allow the tarts to cool completely before serving and adding your toppings of choice. 

Raspberries were WAY expensive at the store and the peaches smelled so heavenly, so I used a combination of peaches and strawberries.  I just cut them up and sprinkled a generous amount of sugar on them and let them sit and sort of juice up for a bit.  As if that wasn't enough, a dollop of Cool Whip on top and viola!  Heaven on earth!


I will admit I ate 2, but I wanted like 4 so I was proud of myself.  If any leftovers, I'd refrigerate them.  On the show Rachel Ray made a suggestion that you could easily add a flavoring to the cream cheese mixture (like lemon or almond extract) and have an array of flavor combinations. (I think a little lemon extract added with some fresh raspberries or blueberries would be divine). My husband who isn't a fan of cheesecake, really enjoyed this too.  He doesn't like his sweets so that is saying something :)

Enjoy!

Friday, July 1, 2011

White Chocolate Frosted Brownies


I have had this recipe bookmarked for awhile now. I saw it on one of my most favorite blogs, How Sweet It Is. She's lovely and her red velvet brownies with white chocolate frosting looked lovely. I was excited to finally get the chance to make them! The frosting is to DIE for, it really was so delish. I had doubled the brownie recipe and my intentions were to make them red velvet, but I did not have 4 tablespoons, yes tablespoons of red food coloring, so I skipped the red velvet part and just made regular brownies. They are so chewy and dense and go superbly with the white chocolate frosting. I don't think I'd double the recipe next time, the cooking time seemed to be a little off and the edges got too crunchy, but we cut off the edges and they were yummy.


White Chocolate Frosted Brownies 
Recipe from How Sweet It Is


Brownies
1/2 cup butter, at room temperature
1 1/2 cups sugar
2 eggs
2 teaspoons vanilla extract
1 1/4 cups all purpose flour
1/4 teaspoon salt
3 tablespoons cocoa powder
2 tablespoons red food coloring *I substituted water instead, not sure if its necessary
2/3 cups chocolate chips (optional)

Preheat oven to 350. Butter and flour an 8 x 8 cake pan. In a small bowl, combine cocoa powder, red food coloring (I used water), and 1 teaspoon vanilla to create a paste. In the bowl of an electric mixer, cream butter and sugar until fluffy. Add eggs one at a time, then add remaining teaspoon of vanilla. With the mixer on medium speed, add in cocoa powder mixture. (You can add in more food coloring if desired at this time, until it is as red as you like it. If doing red velvet of course). Add flour and salt, mixing until just combined. Fold in chocolate chips if desired. Spread in the 8 x 8 pan. Bake for 25-30 minutes, or until toothpick inserted in center comes out clean. Let cool completely before frosting.

White Chocolate Frosting

1 stick of butter, at room temperature
2 1/2 cups powdered sugar
1 teaspoon vanilla extract
4 ounces white chocolate, melted 
1-2 tablespoons milk (or more if needed)

Cream butter in an electric mixer until fluffy, then add vanilla. Slowly add in powdered sugar 1/2 cup at a time with the mixer on low speed. Add in melted white chocolate and beat until incorporated. To reach desired consistency, add in milk 1 teaspoon at a time with mixer on low speed. If frosting becomes too liquidy, simple add additional sugar.


Saturday, June 18, 2011

Cookie Dough Brownies


 I really do love brownies and these are one of my favorite ways to dress a brownie up. It is rich and delicious and pretty much a perfect way to indulge after dinner. The gal from Cookies and Cups is always posting creative and delicious treats. This is a great one! She made her brownies from scratch, which I would suggest if you have the time and the ingredients, but we were in a pinch and used our favorite box mix. It worked out great, but definitely follow her advice of letting the brownies cool overnight or refrigerate them until completely cool! You can try just plain ol' chocolate chip cookie dough, or jazz it up with some Reese's Pieces! The taste of peanut butter was a nice touch. :) 

Cookie Dough Brownies
Recipe from Cookies and Cups 

Brownie layer:
(You can use a box mix or follow the recipe below from her website)

1 c. butter
3/4 c. unsweetened cocoa powder (She used Hershey's Special Dark)
2 1/4 c. granulated sugar
1/2 tsp. salt
3 eggs
1 tsp. vanilla extract
1 1/4 c. all-purpose flour
1/2 tsp. baking powder
1/2 c. mini semi-sweet chocolate chips

Line 9x13 baking pan with foil, so the bottom and sides are covered. Spray with cooking spray. Melt 2 sticks of butter in a medium saucepan; add cocoa, stirring until smooth. Remove from heat and cool slightly. Add sugar, salt, eggs, and vanilla; beat with a spoon until combined. Add flour and baking powder; mix well. Stir in chocolate chips. Spread batter into pan. Bake at 350 degrees for 20-25 minutes. 

*Good tip for brownies is remove from oven when toothpick inserted 1-2 inches from edge comes out clean.
Allow brownies to cool completely before moving on to the next step.

Cookie dough layer:
1 c. butter, softened
1 c. packed light brown sugar
1/2 c. granulated sugar
4 Tbsp. milk
2 tsp. vanilla extract
2 c. all-purpose flour
1 c. mini semi-sweet chocolate chips (and/or Reese's Pieces)

Combine first 5 ingredients in a mixing bowl and cream together. Add flour and stir until combined. Stir in chocolate chips. Spread in an even layer on top of cooled brownies. Chill for at least 15 minutes in fridge before adding the chocolate topping.

Chocolate topping layer:
1 c. semi-sweet chocolate chips
1 Tbsp. Crisco shortening

Melt chocolate and shortening in microwave for 1 minute, stirring until smooth. Spread over the cookie dough layer and chill until topping is set. Keep refrigerated until serving.

This dessert is best served cold!!! Enjoy!

Saturday, June 11, 2011

Raspeberry Almond Shortbread Thumbprint Cookies

We're back and happy to be posting again! Sorry for the long absence. It has been quite the month! Thank you for visiting while we were away. We hope to be back to our regularly scheduled posting here at Delicious Discoveries. :)

I'm excited to be posting about a most delightful little cookie. These were super easy and super delicious.  It's always nice to have a cookie that's different from "the usuals". They are pretty too! 

Raspberry Almond Shortbread Thumbprint Cookies

Recipe from Amber Gale

Makes 2 Dozen

COOKIES
1 C Butter, softened
1/2 tsp Almond Extract
2 C Flour
1/2 C Raspberry Jam (I actually didn't measure and just spooned the jam onto the cookies directly from the jam jar)
2/3 C Sugar

In a large bowl add sugar, butter, and extract.  Mix until creamy.  Add flour and beat until well mixed.  Shape into 1" ball.  With thumb, make a well in the middle of each cookie.  Fill with jam.  Bake 350 for 14-18 min until lightly brown.  Cool completely.  (Mine were still a bit warm, but I wanted my topping to melt just a bit).

GLAZE/TOPPING
1 1/2 tsp Almond Extract
2-3 tsp Water
1 C Powdered Sugar

In a small bowl combine powdered sugar, extract, and water until smooth.  Drizzle over top.


Linked up on 

Friday, May 13, 2011

Strawberry Cheesecake Squares


Aimee made these for a family gathering. They looked so pretty and tasted yummy too! If you want an impressive dessert, go with these strawberry cheesecake squares from Our Best Bites! It would be a great summery dessert. 
Strawberry Cheesecake Squares
recipe from Our Best Bites

1 package Pecan Sandies Cookies, divided
1 1/2 Tbsp. butter, melted
11 oz. cream cheese (1 8-oz. package + 3 oz. of another package, not low-fat), softened
2 eggs
2/3 c. sugar
pinch salt
1 1/2 tsp. vanilla
1/2 tsp. almond extract
2 c. Breakstone’s Sour Cream
1 1/4 c. strawberry sauce or strawberry jam, divided (recipe below; you can also use jarred strawberry topping or canned strawberry pie filling)

Preheat oven to 375. Spray a 9×13 pan with non-stick cooking spray. In a food processor, process 3/4 of the Pecan Sandies (reserve 6). Mix with melted butter and lightly press onto the bottom of the pan. Set aside.


In a large bowl or the bowl of a stand mixer, combine cream cheese eggs, sugar, salt, vanilla, almond extract, and sour cream. Beat on high for 4-5 minutes. Spread half of the cheesecake batter onto the bottom of a 9×13 pan. Pour 3/4 c. of the strawberry sauce over the batter, spreading gently to cover the surface (it doesn’t have to be perfect). Spread remaining cheesecake batter over the strawberry layer and then spoon remaining 1/2 c. of strawberry sauce over the batter. Being careful not to cut into the surface of the cookie crust, swirl the strawberry mixture with a butter knife. (To give it that marbled looking effect) Bake at 375 for 25-35 minutes or until center is jiggly but not liquid. 


While baking, process remaining 6 cookies. During the last 10 minutes of baking, sprinkle the cookies on top of the cheesecake. Chill for at least 8 hours and cut into squares. If desired, drizzle remaining strawberry sauce over the individual squares.


Strawberry Sauce
Recipe from Our Best Bites

1 pint strawberries
1/3 c. white sugar
1 tsp. almond extract (my favorite) or vanilla extract

Wash strawberries and remove stems. If you’re feeling ambitious, you can roughly chop the berries, but I say you’re already feeling ambitious enough by making your own strawberry sauce. So don’t sweat it. Combine berries, sugar, and extract in medium saucepan and bring to a simmer over medium heat. Cook for five minutes, stirring/breaking strawberries up with a wooden spoon constantly. After five minutes, remove from heat and allow to cool slightly (if you have a glass blender jar) and a lot (if you have a plastic blender jar). When cool enough, transfer mixture to blender and pulse until desired consistency is reached.

Sunday, May 8, 2011

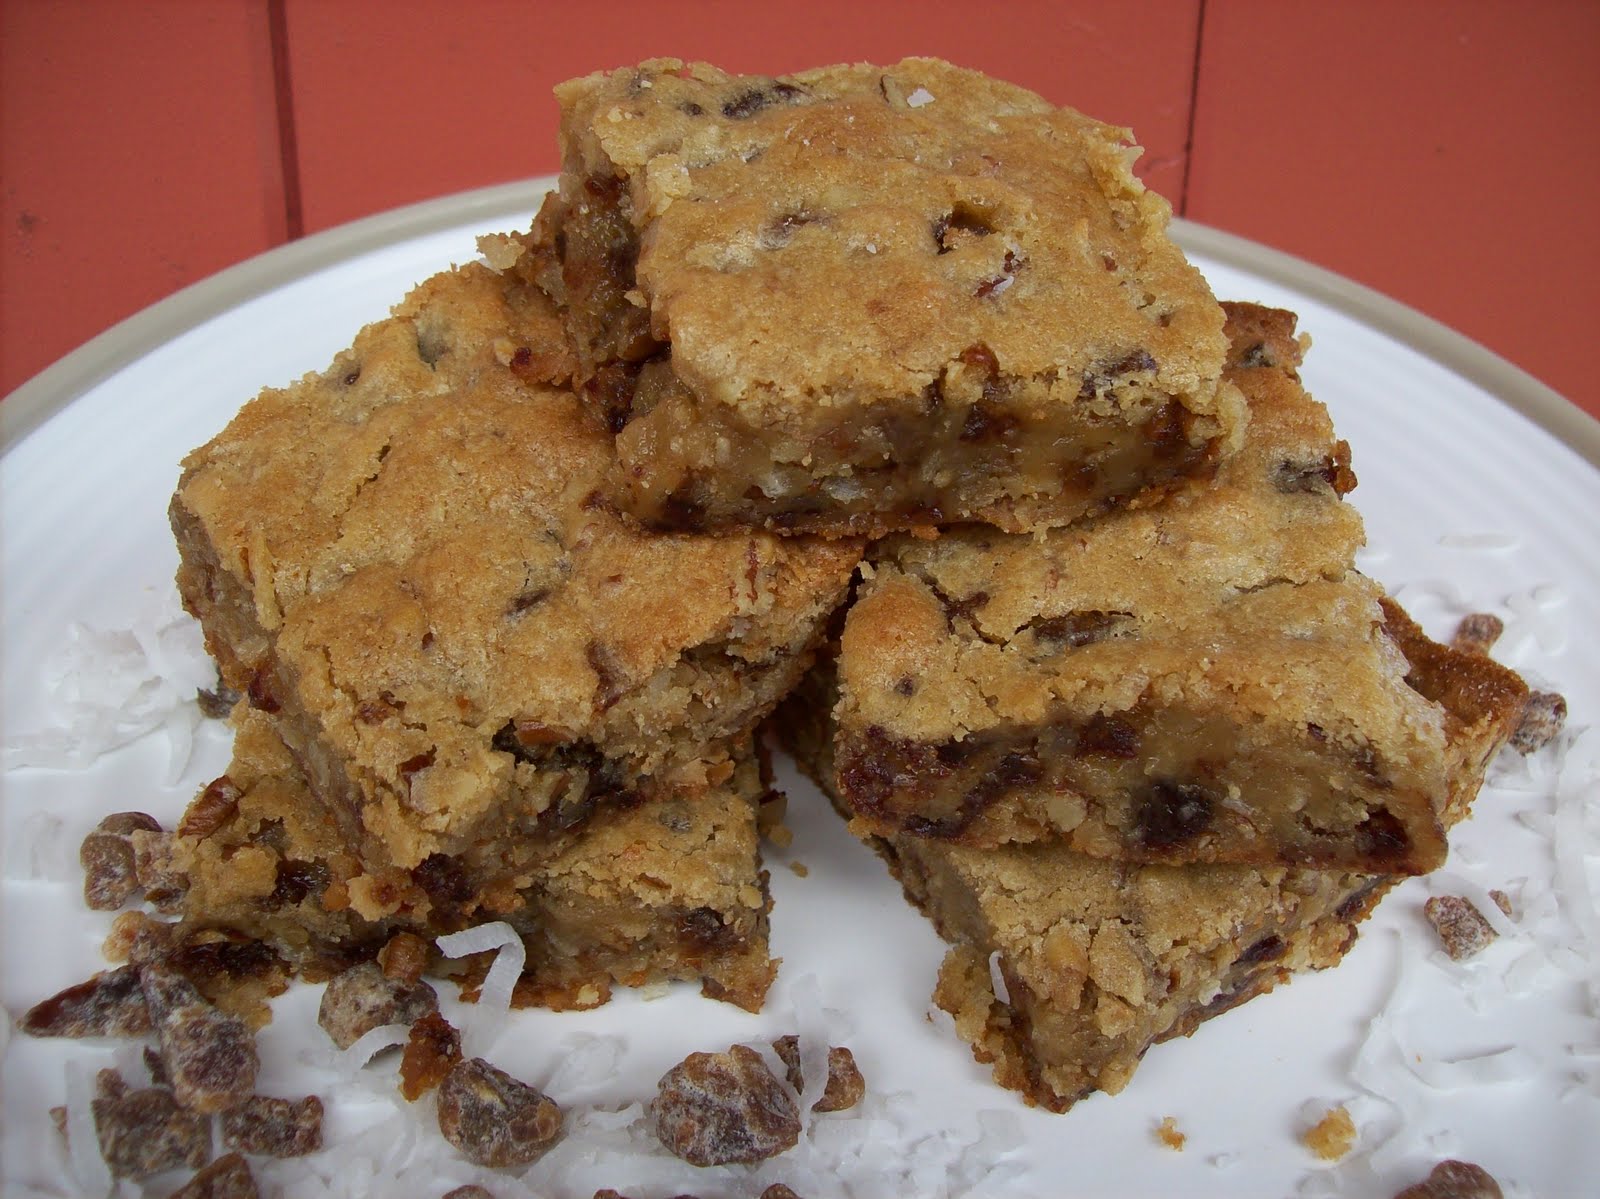
Coconut Date Blondies


I realize the word "dates" may scare some of you from trying these, but don't let that deter you. Dates are sweet and give a wonderful chewy texture! Of course they add a little fiber too. :) So do not fear! I REALLY, really loved these and will definitely make them again. They came out so chewy and sweet and yummy! I have made a lot of treats for the pharmacy students and these ranked in their top favorites! Try them out and see what you think. I think you'll be very surprised and pleased!

Coconut Date Blondies
Recipe from Diana Rattray on About.com

1 cup flour
1 teaspoon baking powder
dash salt
4 ounces butter, melted and slightly cooled (1 stick butter)
1 cup packed light brown sugar
1 1/2 teaspoons vanilla extract
1 large egg
8 ounces chopped dates *I did not use the whole 8oz bag, but most of it, and they were dried, not fresh, see picture above. They're the kind you would snack on.
1/2 cup chopped pecans
2/3 cup flaked coconut *I eyeballed this as well. Just what felt right

Grease and flour a 9-inch square baking pan. Heat oven to 350. In a bowl combine the flour, baking powder, and salt. In a mixing bowl, beat the brown sugar and butter together until smooth. Beat in the vanilla and egg until well blended. Stir in the flour mixture just until moistened, then stir in the dates, pecans, and coconut. Spread/pat into the prepared baking pan. Bake for about 25 minutes, or until golden brown.

Wednesday, May 4, 2011

Twix Brownie Bars


Confessions of a Cookbook Queen is one of the funniest and most inventive bloggers out there. I saw these Twix Brownie Bars on her blog, and being a sucker for brownies and Twix, I pretty much knew right then I was going to be making them. I sure wish mine would have turned out looking like hers. I think my caramel was a little too soft and I wish I would have cut them smaller, but I'm pretty sure they tasted just as good as hers. Seriously, they are so delicious and are super fun to eat. Just like eating a candy bar! They really do taste just like a Twix, and the brownies make them all the more delicious. These were a huge hit at school with the pharmacy students! You gotta try them! They were easy to make until it came time to cutting them in bars and dipping them. I ran into some trouble, but like I said earlier, I think it was due to my caramel being too soft. I'm sure it was the deviation from the original recipe, so next time I'll stick to the individual caramels and cream!

Twix Brownie Bars
*my thoughts are in italics

2 cups flour
1/2 cup sugar
2 sticks salted butter, cut into pieces
14 oz bag of caramels *I used 11oz bag of caramel bits, I would use 14oz next time
3 Tablespoons heavy cream *I used 2T of evaporated milk, but stick with the cream!
Box of your favorite brownie mix (Honeyville Farms) + ingredients to make –any fudgy kind of brownie
Chocolate candy melts or almond bark *I used 1 package almond bark

Preheat oven to 350. Line a 9 x 13 pan with foil and spray with nonstick spray. In a food processor, combine flour, sugar and butter. Process until it comes together to form a dough (you can also use your hands if you don't have a food processor). *I used my hands and it turned out fine, just takes a little more time

Pat the dough in the bottom of the pan. Bake until golden brown, 25 minutes or so. Place the pan in the refrigerator to cool for about 30 minutes and prepare your brownie batter according to instructions. Remove shortbread from refrigerator and spread brownie batter over it evenly. Bake until brownies are set, but still fudgy.

 Place pan in the refrigerator to cool again. Once brownies are firm, place unwrapped caramels and heavy cream in a microwave safe bowl. Microwave on high, stirring every 15 seconds until completely melted and smooth. Pour melted caramel over brownies and spread evenly. Refrigerate again until firm. *very important!

 Grab the ends of the foil and remove from pan. Peel the foil off the sides and bottom and place the brownies on a cutting board and cut into thin bars. Melt candy melts/almond bark according to package directions and dip bars, placing on a wax paper lined baking sheet until chocolate is fully set.

Linked up with 


Friday, April 29, 2011

Glazed Pineapple Coconut Cake


This cake was SO amazing, oh my goodness! My sister Callie has this great blog over at Honeyville Farms Cookin' Cousins that she makes recipes using food storage and freeze dried items. She had used powdered eggs and freeze dried pineapple and it came out looking awesome. I knew I had to try it and I'm so glad I did! I was asked for the recipe multiple times. My husband made me leave him a big piece before I took it to mutual to share. He never asks me to do that, so that is saying something! It is ooey, gooey deliciousness!


Glazed Pineapple Coconut Cake
adapted from Honeyville Farms Cookin Cousins


Cake
1 and 1/2 cups Granulated Sugar
2 cups Flour
1 tsp. Baking Soda
1 tsp. Vanilla

2 eggs
1-20 oz can crushed pineapple (do NOT drain)

1/2 cups Pecans, chopped


In a large bowl combine Sugar, Flour, Baking Soda. In a separate bowl combine the eggs, vanilla and can of pineapple. Mix well and add to dry ingredients. Stir until combined. Pour batter into a 9x13 pan. Sprinkle the top with Pecans.  Bake at 350 for 32-35 minutes.

Topping
3/4 cup Granulated Sugar
1/2 cup Butter
1/2 cup Evaporated Milk
1 tsp. Vanilla

1/2 heaping cup of shredded sweetened coconut

Start making the topping once you pull out the cake from the oven. In a saucepan over medium heat melt Butter.  Add Sugar and Evaporated Milk.  Once combined, cook for 6 minutes, stirring often. After the 6 minutes take off heat and stir in Vanilla and coconut.  Poke some holes in the cake, I used a skewer, or you could use a fork. Pour the topping evenly over the cake, spreading around where necessary to cover everything. Serve warm. Although it is delicious cold as well!


Mommy’s Kitchen

Tuesday, April 26, 2011

Oatmeal Chocolate Chip Cookies


We all know someone who is just darn good at everything they do right? This recipe comes from one of those types of people! She has many, MANY talents, and baking just happens to be one of them. This is my sister Callie's favorite chocolate chip recipe and she uses it all the time! You can substitute the chocolate chips for raisins, or white chocolate, or peanut butter. It is versatile, delicious and a crowd pleaser.


Oatmeal Chocolate Chip Cookies

Recipe from Marilyn Smith


Makes appx 3 dozen cookies

1 cup brown sugar
1 cup granulated sugar
1 cup shortening (or use a combination of shortening/butter/margarine to make a cup.)
2 eggs
2 tsp vanilla
2 Tb. milk
2 cups flour 
1 tsp baking powder
1 tsp baking soda
1 tsp salt
2 cups quick oats (but I really like using's Honeyville Farm's 4-grain)
1 cup choc chips or raisins are really good too
optional 1 cup nuts
 
Beat shortening and sugars until creamy.  Add eggs, vanilla, and milk.  Mix well.  Combine flour, baking powder, baking soda, and salt and mix well.  Add to shortening mixture and mix well.  Stir in oatmeal and other additions (chips, raisins, nuts, etc). Use tablespoon sized balls and put 2 in apart.  Bake on greased cookie sheets at 350 for 10-13 minutes.  Let stand after baking for at least 5 minutes before removing from trays. 


Thursday, April 21, 2011

Boston Cream Pie


This cake, or is it a pie, got rave reviews on Kraft Recipes. My sister, Aimee, made it for a family gathering and the rave reviews continued on there. One family member said, "This is the best filling I've EVER had in a Boston Cream Pie." I can't wait to try this one out. Doesn't it just LOOK delicious? She did a pretty superb job I'd say. As professional as it looks, it was a cinch to make. And for those of you watching your calories or sugar, you can change your ingredients to sugar free or lite options. 


Boston Cream Pie
recipe from Kraft Foods


1 pkg. (3.4 oz.) Jell-o french vanilla flavor instant pudding
1 cup  plus 2 Tbsp. cold milk, divided
1-1/2 cups thawed Cool Whip whipped topping
1 round yellow cake layer (8 or 9 inch) **see below for what she did with the rest of the batter
1 square Unsweetened Chocolate
1 Tbsp.  butter
3/4 cup powdered sugar

Beat pudding mix and 1 cup milk with whisk 2 min. Stir in Cool Whip. Let stand 5 min. Meanwhile, cut cake horizontally into 2 layers with serrated knife. Stack cake layers on serving plate, spreading pudding mixture between layers.Microwave chocolate and butter in microwaveable bowl on high 1 min.; stir until chocolate is melted. Add sugar and remaining milk; mix well. Spread over cake. Refrigerate 1 hour.

**Instead of making 2 round cakes I made 1 round for the pie and with the other half of batter I made 12 cupcakes.  It was perfect for the kids.  You could easily make 2 pies though, one 8 or 9 inch pie isn't very big, just remember to double the filling and ganache if you do make 2 pies.  You could always freeze the other half and make it again within the month.


Linked to 

Sunday, April 17, 2011

Peanut Butter Truffle Brownies


My sister found these brownies at Creations by Kara. She knew she was making them right then and there, and she did, and she loved them and everyone else did too! She said they even got better with age. You can never go wrong with peanut butter and chocolate. She said the peanut butter topping tasted like a creamy Reese's Pieces. Um hello?! They are rich and decadent, just like any good dessert should be in my book! I hope you all enjoy them as much as my family did.

Peanut Butter Truffle Brownies
recipe from Creations by Kara


Brownie Layer:
3 cups sugar
3 cups flour
3/4-1 cup cocoa
1 1/2 tsp salt
6 eggs
1 1/2 cups oil
3/4 cup milk
Combine all ingredients in order listed and mix till smooth. Pour into a well greased 15×10″ jelly roll pan. Bake at 350 for about 20-25 minutes. Cool completely.
Truffle Layer:
1/4 cup soft butter
1 cup peanut butter
3 cups powdered sugar
1/4 tsp salt
1 tsp vanilla
5-6 Tbsp milk
Beat butter and peanut butter together. Add powdered sugar, salt, vanilla, and enough milk till mixture is creamy. It will be thicker than regular frosting. You can kind of spread and pat it onto the top of the brownies with the back of a spoon.
Topping:
1 cup semi sweet chocolate chips *3/4 cup would be plenty
2-3 Tbsp vegetable oil *if using 3/4 cup chips, cut back on the oil too!
For the topping, combine 2 Tbsp of the oil and the chips in a small glass bowl. Microwave at 50% power till melted, stirring often. Add more oil if needed. Drizzle over the top of the brownies.


***Best when served chilled!

and


and


and

Mommy’s Kitchen

Sunday, April 3, 2011

Gooey Butter Cake


I apologize for the picture. I took this to a lunch with friends and this was the only piece left that I could salvage for a picture. So despite what it looks like, it tastes heavenly! You can always trust Paula Deen though, it is her recipe, and I came across it at See Jane. It is super simple to make and it is so yummy. I baked mine a little longer so it wasn't as gooey, but either way you can't go wrong. Try it out!


Gooey Butter Cake
recipe from Paula Deen via See Jane in the Kitchen


Crust:
1 yellow cake mix
1 egg
1/2 cup butter (1 cube), melted

Filling:
1 8 ounce package cream cheese, softened
2 eggs
2 teaspoons vanilla
1 stick butter, melted
3 cups powdered sugar

Combine crust ingredients and pat into a 9 X 13 pan. Beat cream cheese, eggs, and vanilla until smooth. Add butter and sugar. Mix well. Pour over crust. Bake at 350 degrees for 45 minutes.

*I liked See Jane's idea of variations with this cake. Using lemon cake mix for the crust and adding lemon juice and zest to the filling. I'll have to try that next time!

Tuesday, March 15, 2011

Mint Brownies


I have had this recipe bookmarked for a long time. I'm so mad at myself for not trying them before now, because I have really been missing out. These are sharing the top spot with my favorite brownies ever. I will not wait long to make these again. They were unbelievable, and if you chill them, they taste like your own chocolate mint ice cream bar. Mmmm, please try them right now! They were such a huge hit with my husband's study group, they were taking pictures of them and calling their friends to come try them. So you can trust me when I say they're good!!! Mel's Kitchen Cafe has a "lighter" version of these brownies that I am super tempted to try out next time. I did use her chocolate ganache layer and it was perfect!

Mint Brownies

Brownie layer
adapted from Make It Do

1 c. melted butter
½ c. cocoa powder 
2 c. sugar
4 eggs beaten
1 tsp. vanilla
½ tsp. salt 
1 ½ c. flour sifted 

Whisk together melted butter and cocoa powder. Then add sugar, eggs, vanilla and salt. Mix well and add flour. Stir in by hand, do not over mix. Pour into 9×13 pan sprayed with cooking spray. Bake at 350 degrees for 25-27 minutes.  Cool for a few minutes and then place in freezer for 20 minutes. While brownies are in the freezer make mint frosting.

Mint Frosting layer
adapted from Very Hungry Caterpillar, BYU Brownie

5 Tbsp. margarine, softened
dash of salt
2 Tbsp. milk
1 Tbsp. light corn syrup
2 1/3 c. powdered sugar
1/2 tsp. mint extract
3 drops green food coloring

Beat margarine until softened. Add salt, corn syrup, and powdered sugar. Beat until smooth and fluffy. Add mint extract and food coloring. Mix. Add milk gradually until a smooth consistency. Spread onto brownie layer. Place brownies back in freezer for another 20 minutes then make chocolate ganache layer after the 20 minutes.

Chocolate Ganache Layer

3 T butter
¾ c semi-sweet chocolate chips

To prepare the glaze, combine the chocolate chips and 3 tablespoons butter in a medium microwave-safe bowl. Microwave at HIGH 30 seconds or until melted.  Let stand 2 minutes. Spread chocolate mixture evenly over top. Cover and refrigerate until ready to serve.